Sunday 26 February 2012

The Weather Outside is Frightful...

...but in here I've got a lovely boyfriend who cooked me a delicious dinner.

Starter of homemade Miso Soup: our (apparently this isn't allowed) JOHN'S first attempt and it turned out pretty tasty :)

Followed by this recipe for miso marinated fish. Fish is just miscellaneous fish from the supermarket bought because it's half price, served with pumpkin and pepper and spring onions.

Finished off with Chocolate Brownies and Cream. Except I'd eaten them all before I managed to get a photo. Oops!

When I've got food like this, Let it Snow, Let it Snow, Let it Snow! (And boy did it the other day)

About 5 inches in one night. Oh Japan, why do you do it to me? 

Friday 24 February 2012

My week: Doing as I please

So as I moaned about mentioned last week, John spent the week in Sapporo for work, and so I was all alone. Apart from my blues on Saturday, I actually quite enjoyed a week of being 100% selfish and not having to think about someone else in my plans. I mean, I wouldn't want him away much longer but it's good to have free reign for a while!

So, as well as a couple of lunches with friends and excessively enjoying Hinamatsuri, I have also been...

Prancing about in front of the mirror in my new dress

Watching endless episodes of Scrubs. John doesn't like it and I have a rarely indulged love, so on it went :D

Eating far too much chocolate, and trying out chocolate fish for the first time. I don't remember the name but they are delicious!

Re-reading everything Jane Austen ever wrote on my kindle. If I was in England, I'd hate kindles. Living abroad, I see them as one of the best inventions ever made.


Cooking and eating lots of homey food, like this pumpkin soup with croutons. Mmmm.

Having random lunches out, just because I can. This is ramen from our local ramen place and it's delicious. Leaves you feeling like a bloated, greasy, sleepy mess though! 

Getting a haircut. 

Having lazy breakfasts.

Playing more with felting (Again, blogger with the stupid photo rotating. GRR)


Listening to the Evita soundtrack a lot. 4 years with me has made John be able to cope with most musicals soundtracks, but Evita is still beyond him, so it's always blasted out when he's away! 

I hope you've all been indulging yourself in your favourite things this week too!

Thursday 23 February 2012

Origami Pattern: Hinamatsuri Part 2

In my last post, I shared a pattern for an origami Empress from a Hinamatsuri Display. Now, we're going to make our Emperor. 

You need the 10x10 square of manly coloured paper. 

He starts off just the same as his wife, so I'm going to be cheeky and tell you to refer to steps 1 to 6 from the last post. Sorry!

1. Hopefully you've got something that looks like this...


2. 2. Fold the top open edge on each side back down to the last crease you made. Then fold it in half again back up. (Oh and that nasty white bit because your folding wasn't 100% perfect all the time? Just fold it behind. Nobody will ever know :D)


3. Turn the model over. Fold the point from each side in along the fold that's already there. I suggest you glue it down. Ta-da! Body finished :D


4. Now this bit is going to look very similar to what we did for the Empress too. Still working on the back, fold the top centre point all the way down to the bottom centre. Then fold the point back up to the centre of the previous fold. Unfold both of these folds. 


5. Turn the model over and cut the top layer ONLY of paper along the top crease. Unfold the two flaps this frees up and fold them behind.


6. Fold the model in half so the pretty folding is on the outside. Cut 5mm along the bottom of the two creases from step 4. Don't get carried away and do the third cut we did for the Empress. The Emperor doesn't want a v-necked outfit!


7. Take the white point at the top of the model and fold it backwards, through the cut in the centre. Gently pull it up as far as the hole lets you. Then carefully fold down the excess loop of paper at the back of the model. 

8. Almost finished! Fold the white tip backwards down to where the white meets the coloured paper. Then, fold it back up again halfway to give your Emperor a lovely little top knot. 


9. Colour his hair in, and if you want to, give him a face.


Luckily, just like his lady, the Emperor has a handy item in his hands to cover up any inaccuracies! He's holding an imperial baton (whatever that is). Cut a long thin rectangle, about 5mmx2cm, slightly rounded at one end, out of gold paper, and stick in the centre of your model. Before you do this, however, you might want to stick his arms and head down nicely.


Here are my four dolls! 

So that's all the difficult folding done! Tomorrow I'll blog how to make it into a proper display, but even if you don't want to do that, the dolls look lovely by themselves, or they make very pretty greetings cards.


Wednesday 22 February 2012

Origami Pattern: Hinamatsuri

In my last post, I showed you a photo of the Hinamatsuri display I made at the Sendai International Centre event last week.

And since I love it so much, I want to share how to make it with everyone! I make no claim to have made this up myself, or for it to be a new pattern, but I want to share it so you can make your own! They're very easy to make. In this post, I'll be telling you how to make the Empress Doll. 

To make the two dolls, you need

2 10cm (ish) squares of paper. In an ideal world, washi paper, but normal origami paper is fine too, as is wrapping paper/any other fairly think paper that pretty coloured paper on one side and white on the other. One piece should be girly colours, and the other manly ones. 
A little piece of gold paper, about 3cm square

Glue and scissors


I hope my instructions make sense, the photos are probably clearer than my ramblings. I'm not a fan of fancy origami terms, I think they make it more complicated than it needs to be, so this is written just as my head thinks! Please ask in the comments if you need more details.

We're going to start with our Empress, so you want your girly colour square of paper first.


1. Start with your paper white side up. Fold your paper in half diagonally and unfold, and then fold across the other diagonal and unfold.


2. Fold one corner into the centre, then fold up along the centre crease. Fold the top of this section down to the bottom.


3. Fold the right upper diagonal edge to the centre crease.


4. Now is the only slightly tricky bit of the whole model! Unfold the last fold you did. Now the idea is that star A goes to start B, and the two black lines I've drawn on match up. Make a little crease at star A, then fold it up, making the corners nice and neat. Then, as you fold it right down, the big top flap needs to come back down to the position it was before this step. Hopefully it looks like the photo at the bottom of this section :D


5. Repeat steps 3 and 4 on the other side.

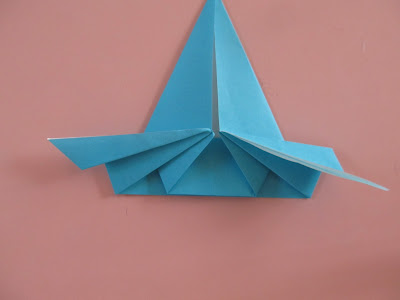
6. From where my finger is on that last photo, fold those flaps up and out, at the angle shown on the photo below. Repeat for both sides.


7. Unfold these two folds, and fold the bottom points up to the centre. Then refold the original folds. 


8. At the top of these, just fold over the top little point. (The second photo is taken from the back and makes it clearer. OK, now your doll's body is finished :D 


9. Time for the head. Turn the model over and fold the top centre point all the way down to the bottom centre. Then fold the point back up to the centre of the previous fold. Unfold both of these folds.


10. Turn the model over. Take your scissors and cut the top layer ONLY of paper along the top fold. Unfold the two flaps this frees up and fold them behind.

(Now before you say it, I know, I know traditional origami doesn't use scissors. But this one does. Too bad. I'm going to suggest using glue later too. Sorry purists!)


11. Fold the model in half, so that you can still see the detailed folding on the front. Make a 5mm cut along the lower of the two fold lines from step 9. Then, put your scissors in this cut and cut 5mm down along the centre fold towards the body.


12. Have the model front side upwards. Push the two (or four depending how you think of it) tiny flaps that your snipping has created backwards through the model, which creates a v neck for our Empress's dress. It should currently be a triangular hole looking from the front of the model. 


13. Take the white point at the top of the model and fold it backwards, through the triangular hole. Gently pull it up as far as the hole lets you. Then carefully fold down the excess loop of paper at the back of the model. (If you were a bit overenthusiastic with the scissors, you might be able to see some of the coloured paper from behind through the neckline. Just unfold the head and fold the bits you can see down and out of the way.)


14. Fold the top white point down to the bottom of the white section below.


15. Draw on hair, and if you prefer cute to traditional, a face. And, やった!


If you are worrying that the centre isn't quite even, then fear not! Luckily the Empress in a Hinamatsuri display traditionally holds a fan. Cut one out of some gold paper and stick it across that messy bit in the middle. Perfect :D You'll also probably find that not all of the flaps stay flapped down, so just use a bit of glue behind each arm and at the back of the head to make sure she stays looking her best! 


I hope you managed to follow my instructions OK and will continue on to make the rest of the display over the next couple of days :D