In my last post, I shared a pattern for an origami Empress from a Hinamatsuri Display. Now, we're going to make our Emperor.
You need the 10x10 square of manly coloured paper.
He starts off just the same as his wife, so I'm going to be cheeky and tell you to refer to steps 1 to 6 from the last post. Sorry!
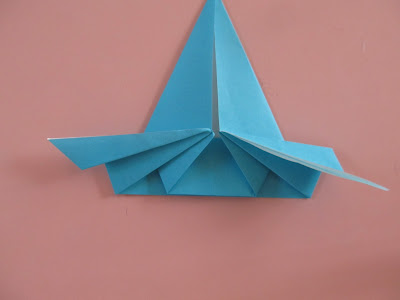
1. Hopefully you've got something that looks like this...
2. 2. Fold the top open edge on each side back down to the last crease you made. Then fold it in half again back up. (Oh and that nasty white bit because your folding wasn't 100% perfect all the time? Just fold it behind. Nobody will ever know :D)
3. Turn the model over. Fold the point from each side in along the fold that's already there. I suggest you glue it down. Ta-da! Body finished :D
4. Now this bit is going to look very similar to what we did for the Empress too. Still working on the back, fold the top centre point all the way down to the bottom centre. Then fold the point back up to the centre of the previous fold. Unfold both of these folds.
5. Turn the model over and cut the top layer ONLY of paper along the top crease. Unfold the two flaps this frees up and fold them behind.
6. Fold the model in half so the pretty folding is on the outside. Cut 5mm along the bottom of the two creases from step 4. Don't get carried away and do the third cut we did for the Empress. The Emperor doesn't want a v-necked outfit!
7. Take the white point at the top of the model and fold it backwards, through the cut in the centre. Gently pull it up as far as the hole lets you. Then carefully fold down the excess loop of paper at the back of the model.
8. Almost finished! Fold the white tip backwards down to where the white meets the coloured paper. Then, fold it back up again halfway to give your Emperor a lovely little top knot.
9. Colour his hair in, and if you want to, give him a face.
Luckily, just like his lady, the Emperor has a handy item in his hands to cover up any inaccuracies! He's holding an imperial baton (whatever that is). Cut a long thin rectangle, about 5mmx2cm, slightly rounded at one end, out of gold paper, and stick in the centre of your model. Before you do this, however, you might want to stick his arms and head down nicely.
Here are my four dolls!
So that's all the difficult folding done! Tomorrow I'll blog how to make it into a proper display, but even if you don't want to do that, the dolls look lovely by themselves, or they make very pretty greetings cards.


No comments:
Post a Comment